 אינדקס


http://wiki.xbmc.org/index.php?title=Run_or_install_XBMC_from_USB_drive
הפעלה והתקנת XBMC מתוך דיסקו און קי USB עם UBUNTU XBMCBUNTO
The general procedure to install XBMCbuntu from a USB flash drive is:
Acquire the correct XBMCbuntu installation files ('the ISO')
Put XBMCbuntu/Ubuntu onto your USB flash drive
Configure your computer to boot from USB flash drive and boot from it
Try XBMCbuntu/Ubuntu or install it to your hard drive.
2 Introduction

XBMCbuntu much like Ubuntu can be installed from a USB flash drive. This may be necessary for netbooks and other computers without CD drives and is handy for others because a USB flash drive is so convenient. Also, you can be configured on the USB flash drive to save changes you make, unlike a read-only CD-ROM drive.
Booting from a USB flash drive created with this utility will behave just as if you had booted from the install CD. It will show the language selection and then the install menu, from which you can install XBMCbuntu onto the computer's hard drive or launch the Live USB environment.
XBMCbuntu can also be installed to a USB flash drive, though live-span of said drive will be reduced due to the read/write cycles that XBMC requires. A tmpfs can be created to mitigate this though it is not covered by these instructions.
You can also install Ubuntu and then XBMC ontop while this guide is only about creating a booting flash drive from a iso process which is similar. Its either or, not both.
3 Prerequisites
To create a USB installation disk, you will need:
A 2 GB USB flash drive. Files on this USB disk will be erased, so previously backup your documents. Make sure this USB disk is properly formatted and mounted.
An XBMCbuntu ISO file see XBMC Download to download it.
Note: If your installing XBMC ontop of Ubuntu use the Ubuntu iso instead of XBMCbuntu iso. The iso to flash drive process is similar between XBCMbuntu.iso and Ubuntu.iso see next line
An Ubuntu image file see Supported Linux distributions to download it)
4 Creating a bootable XBMCbuntu USB flash drive
4.1 From Ubuntu
Be aware existent data contained in the usb flash drive will be lost.
Install and run usb-creator
You can find usb-creator-gtk in the Unity Dash by typing "Startup Disk Creator" (Ubuntu Desktop) or usb-creator-kde in K-Menu-->Applications-->System-->Startup Disk Creator (Kubuntu). If it is not there, then you can install it using the Synaptic Package Manager or Ubuntu Software Center
Insert and mount the USB drive. Inserting the USB drive should auto-mount it.
Start usb-creator. It looks like this:
in the top pane of usb-creator, pick the .iso file that you downloaded.
if the .iso file isn't listed, click "Other" to locate and select the .iso file that you downloaded.
Alternately, if you have a CD or DVD-ROM with the Ubuntu version you want to install on the USB flash drive, insert it in your CD-ROM drive and usb-creator can use that.
It is not necessary to erase the USB flash drive, however it is advisable that you do so.
Select the first bootable partition on the USB device as the disk to use
The bootable partition should be formatted as either a FAT16 or FAT32 filesystem. This is the default for most USB flash drives.
Note: NEVER use one of your hard drive partitions in this process unless you really know what you are doing, as data will get erased.
There may be a bug during the formatting which will cause two partitions to appear when booting from the USB flash drive. Try selecting each of them and one should work. If not, restart the computer and try booting from the USB flash drive again.
If you get a DBus error with usb-creator, this bug report may be helpful: https://bugs.launchpad.net/ubuntu/+source/usb-creator/+bug/458334
4.2 From Mac OSX
4.2.1 UNetbootin (Automated, graphical approach)
Unetbooting lets you create bootable images in OSX, resulting USB Flash drives are only bootable on PC's
UNetbootin for Mac OS X can be used to automate the process of extracting the ISO file to USB, and making the USB drive bootable. The resulting USB drive, however, can be booted on PCs only. If attempting to make a USB drive that can be booted from a Mac, or if UNetbootin does not successfully create a bootable drive, follow the instructions below.
4.2.2 Manual Approach
If you would prefer to use a USB bootable in Mac, please follow the instructions below.
Note: This procedure requires an .img file that you will be required to create from the .iso file you download.
Drag and Drop a file from Finder to Terminal to 'paste' the full path without typing and risking type errors.
Download the desired file
Open the Terminal (in /Applications/Utilities/ or query Terminal in Spotlight)
Convert the .iso file to .img using the convert option of hdiutil (e.g.)
hdiutil convert -format UDRW -o ~/path/to/target.img ~/path/to/XBMCbuntu.iso
OS X tends to put the .dmg ending on the output file automatically.
Run
diskutil list
to get the current list of devices
Insert your flash media
Run
diskutil list
again and determine the device node assigned to your flash media (e.g. /dev/disk2)
Run
diskutil unmountDisk /dev/diskN
(replace N with the disk number from the last command; in the previous example, N would be 2)
Execute
sudo dd if=/path/to/downloaded.img of=/dev/diskN bs=1m
(replace /path/to/downloaded.img with the path where the image file is located; for example, ./XBMCbuntu.img or ./XBMCbuntu.dmg).
Using /dev/rdisk instead of /dev/disk may be faster.
If you see the error dd: Invalid number '1m', you are using GNU dd. Use the same command but replace bs=1m with bs=1M.
If you see the error dd: /dev/diskN: Resource busy, make sure the disk is not in use. Start the Disk Utility.app and unmount (don't eject) the drive.
Run
diskutil eject /dev/diskN
and remove your flash media when the command completes
Restart your Mac and press Option while the Mac is restarting to choose the USB flash drive
4.2.3 MacBook Air 13" 2010
Please notice: While all of the info and above commands are executed properly on a MacBook Air 3,2 (that is the 2010 version 13" version of the Air) the end result will not produce a bootable USB device, at least not with the image for Ubuntu 10.10 64-bit. When booting of the USB device the following message or something similar will appear: "Missing operating system" and the process is auto-magically halted.
To get the USB device (e.g. a USB stick) to show up at all in the boot menu you also may have to reboot/turn on/off the computer a couple of times and also resync the partition tables using rEFIt. After doing this the USB should then appear as a bootable device while holding in the alt or c key when you are rebooting the computer. Notice that both the computers built in bootloader and rEFIt will identify the USB device as a Windows device, but that's not a problem and expected.
A workaround to the-usb-device-is-not-booting-problem is to:
Install rEFIt.
Create a bootable start disk using Ubuntu and a USB stick.
Create a separate partition on the Airs HD.
dd the whole USB stick to that partition.
Resync with rEFIt. Turn power off and on.
Select Pingo/Windows logo: Install should start. (Here you might want to press F6 to change parameters, e.g. use nomodeset)
Alternatively, burning a CD and installing via an external CD-drive will work fine on the Macbook Air 3,2.
4.3 From Windows

Creating a XBMCbuntu or Ubuntu USB disk is easy, including Live mode.
Download and use Live USB Creator aka LiLi.
Choose a USB flash drive in the dropdown list
Select an ISO/IMG/ZIP file or Download
If you want to create a Live USB choose the size of persistent data (usually between 250 MB and 2 GB)
Check the options you want
Click the lightning button to start the creation
Each mandatory step (1, 2 and 3) has a traffic light to indicate its state:
Red light: the step has not been carried out correctly, you cannot start creating a Live USB key Orange light: there is a non blocking problem during this step, you can still start the creation Green light: everything is fine
Note: Instead of usb-creator.exe you can use Unetbootin to create a bootable USB flash drive. http://unetbootin.sourceforge.net/
You won't be able to select the USB flash drive if it wasn't formatted in a way that Windows can see it. You may have to format it using Windows Explorer in order for it to show up in a creator tool.
5 Booting the Computer from USB
Remove all unneeded USB items, but keep the network cable attached.
Insert the bootable USB flash drive that you just created in your target computer and restart it. Most newer computers can boot from a USB flash drive. If your computer does not automatically do so, you might need to edit the BIOS settings.
Restart your computer, and watch for a message telling you which key to press to enter the BIOS setup. It will usually be one of F1, F2, F8, DEL, ESC or F10. Press this key while your computer is booting to edit your BIOS settings. (On HP Mini Netbooks, they correct key is usually F9, Asrock ION machines is F11)
Instead of editing BIOS settings, you can chose a boot device from the boot menu. Press the function key to enter the boot menu when your computer is booting. Typically, the boot screen displays which key you need to press. It maybe one of F11, F12, F10. Note: with some motherboards you have to select 'hard disk/USB-HDD0' to choose the USB flash disk.
If you need to edit the Boot Order, depending on your computer, and how your USB key was formatted, you should see an entry for "removable drive" or "USB media". Move this to the top of the list to make the computer attempt to boot from the USB device before booting from the hard disk.
Note: Some Machines may not support booting from USB flash drive. Plop boot manager makes it simple to boot from CD and then boot from USB flash drive, you still require a CD drive in the machine via this method.
Plop boot manager For more instructions and download.
5.1 Mac
Restart your Mac and press Option while the Mac is restarting to choose the USB flash drive
6 Alternative methods
6.1 Installing XBMCbuntu directly on a USB flash drive
In order to install a fully working Ubuntu operating system on your USB flash drive make sure that:
Your USB flash drive has more than 2GB of space
Your USB flash drive is bootable
Your USB flash drive has a high read/write speed and is USB 2.0 enabled
Your USB flash drive has persistence enabled
See A better way to create a customized Ubuntu live usb drive
Note: Though it refers to Ubuntu you can adapt it 100% to XBMCbuntu iso, since being a variant of Ubuntu anyway.
6.2 Create Bootable USB Manually
Here is a way to create a bootable USB flash drive manually. The advantage is you don't have to empty your USB flash drive as long as you have enough space for the files. It also allows multi boot, so you can, for example, have your USB flash drive holding other OS and other Boot CD tools at the same time.
In order to do so you need :
Bootable USB flash drive ( NTFS / FAT32 / FAT 16 ), Disk with MBR, you can do this with gparted in Linux or HP format in Win, fdisk ....etc
XBMCbuntu or Ubuntu ISO
Tools to extract files from the ISO ( ISO Mount, WinZIP, WinRAR, 7Zip, etc....)
Grub4Dos
Grub4DOS Tutorial
Grub4DOS 0.4.4 for WIN9x/DOS/Linux (Download Here)
Grub4DOS GUI for WINXP/Vista/7 (Download Here
First you need to install grub onto the USB's MBR. Follow the link to the Grub4DOS Wiki: Simple example:
./bootlace /dev/sdx
For more details, visit: grub4dos
Next, you open up the ISO file and extract the files in casper directory. The size (and possibly manifest) are needed if you want to install from the USB flash drive otherwise the install will fail.
total 701060
-rwxr-xr-x 1 adrian adrian 38784 2010-07-27 16:15 filesystem.manifest
-rwxr-xr-x 1 adrian adrian 10 2010-07-27 16:15 filesystem.size
-rwxrwxrwx 2 adrian adrian 704487424 2010-04-29 05:38 filesystem.squashfs*
-rwxrwxrwx 1 adrian adrian 9365872 2010-04-29 05:34 initrd.lz*
-rwxrwxrwx 1 adrian adrian 4029792 2010-04-16 06:01 vmlinuz*
/media/Fujitsu 60GB USB/bootimg/ubuntu.10.4.x86$
Copy grldr to the root of the drive.
drwx------ 1 adrian adrian 4096 2010-05-05 16:49 bootimg/
-rwxrwxrwx 1 adrian adrian 220049 2009-09-24 17:30 grldr*
-rwxrwxrwx 1 adrian adrian 2760 2010-05-04 23:08 menu.lst*
/media/Fujitsu 60GB USB$
Now create menu.lst at the root of USB. Example of menu.lst:
default /default
#####################
title Ubuntu 10.04 LiveCD
find --set-root /bootimg/ubuntu.10.4.x86/initrd.lz
kernel /bootimg/ubuntu.10.4.x86/vmlinuz boot=casper live-media-path=/bootimg/ubuntu.10.4.x86/ ignore_uuid
initrd /bootimg/ubuntu.10.4.x86/initrd.lz
boot
Make sure the path match where the files you copy to.
Now, reboot.
6.2.1 Simpler way using the ISO file
Another way is just using the ISO file as it is on an already bootable USB flash drive that uses Grub (to create one, see above).
Copy the iso file onto the USB flash drive in the root (top) directory
Add these lines to the menu.lst file:
title Ubuntu 11.04 i386
find --set-root /ubuntu-11.04-desktop-i386.iso
map /ubuntu-11.04-desktop-i386.iso (0xff)
map --hook
root (0xff)
kernel /casper/vmlinuz file=/cdrom/preseed/ubuntu.seed boot=casper iso-scan/filename=/ubuntu-11.04-desktop-i386.iso splash quiet --
initrd /casper/initrd.lz
Note: This might not work with all versions of grub. It was tested with GRUB4DOS 0.4.4 2008-11-11
7 Known Issues
Ubuntu 11.04 is having issues with USB flash drives from SanDisk that have U3 Launchpad. You can either use another brand or use either u3-tool from Ubuntu Repositories or SanDisk's U3 Launchpad Removal Tool to remove U3.
Ubuntu 10.04.3 is having issues. You might get a segmentation fault if used from command line. There are many launchpad bugs regarding segmentation fault (eg: 572611).
Some BIOS's (eg., the Eee PC netbook') have trouble recognizing that the USB is bootable. You may have to trick it into booting using the following method: At boot, enter the BIOS by pressing F2. Then, right as you exit the BIOS, hit the Esc key. For some systems, this will bring up the boot menu.
The error "Can not mount /dev/loop1 on /cow" is because usb-creator.exe is not creating a valid casper-rw file holding ext2/ext3 filesystem. Fixes:
Use Unetbootin or
After running usb-creator.exe, recreate casper-rw using cygwin tools or http://www.pendrivelinux.com/casper-rw-creator-make-a-persistent-file-from-windows/. (As of April 2010)
You need Mac OS X to create a USB flash drive that can boot on Macs. Even so, the process is less reliable than using a CD, as the USB flash drive is not always recognized on boot. Reversely, you can't create bootable USB flash drives for other platforms than Macs from withing Mac OS X. This is because Macs use a custom EFI bios with a custom boot-loader and need a special filesystem layout to boot correctly.
7.1 Resolving problematic installs
If you are having problems not being able to get the installer to behave, below some steps that should correct that.
Boot your system with the installer thumbdrive and select the "Try Ubuntu" option. This should boot into XBMC.
Click the Shutdown menu in XBMC (lower-left corner) and select "Exit"
You should be presented with a log-in screen. Click "Other..." and enter xbmc as the login and select XBMCbuntu from the dropdown menu (below the Login field).
Click "Login" and you will be prompted for the Password; just leave it blank.
Click "Login" again and the XBMCbuntu desktop should be displayed.
On the top-left corner of the desktop should be an icon to install Ubuntu. Double-click the icon and, hopefully, you'll get the installation wizard this time.
8 See also
See also: XBMCbuntu and XBMCbuntu FAQ
9 Credits
These instructions have been adapted from the Ubuntu Community Documentation and credits for its creation are attributed Ubuntu Documentation Team as per their creative commons licence 3.0.
הפעלה והתקנת XBMC מתוך דיסקו און קי USB עם UBUNTU XBMCBUNTO
The general procedure to install XBMCbuntu from a USB flash drive is:
Acquire the correct XBMCbuntu installation files ('the ISO')
Put XBMCbuntu/Ubuntu onto your USB flash drive
Configure your computer to boot from USB flash drive and boot from it
Try XBMCbuntu/Ubuntu or install it to your hard drive.
2 Introduction
XBMCbuntu much like Ubuntu can be installed from a USB flash drive. This may be necessary for netbooks and other computers without CD drives and is handy for others because a USB flash drive is so convenient. Also, you can be configured on the USB flash drive to save changes you make, unlike a read-only CD-ROM drive.
Booting from a USB flash drive created with this utility will behave just as if you had booted from the install CD. It will show the language selection and then the install menu, from which you can install XBMCbuntu onto the computer's hard drive or launch the Live USB environment.
XBMCbuntu can also be installed to a USB flash drive, though live-span of said drive will be reduced due to the read/write cycles that XBMC requires. A tmpfs can be created to mitigate this though it is not covered by these instructions.
You can also install Ubuntu and then XBMC ontop while this guide is only about creating a booting flash drive from a iso process which is similar. Its either or, not both.
3 Prerequisites
To create a USB installation disk, you will need:
A 2 GB USB flash drive. Files on this USB disk will be erased, so previously backup your documents. Make sure this USB disk is properly formatted and mounted.
An XBMCbuntu ISO file see XBMC Download to download it.
Note: If your installing XBMC ontop of Ubuntu use the Ubuntu iso instead of XBMCbuntu iso. The iso to flash drive process is similar between XBCMbuntu.iso and Ubuntu.iso see next line
An Ubuntu image file see Supported Linux distributions to download it)
4 Creating a bootable XBMCbuntu USB flash drive
4.1 From Ubuntu
Be aware existent data contained in the usb flash drive will be lost.
Install and run usb-creator
You can find usb-creator-gtk in the Unity Dash by typing "Startup Disk Creator" (Ubuntu Desktop) or usb-creator-kde in K-Menu-->Applications-->System-->Startup Disk Creator (Kubuntu). If it is not there, then you can install it using the Synaptic Package Manager or Ubuntu Software Center
Insert and mount the USB drive. Inserting the USB drive should auto-mount it.
Start usb-creator. It looks like this:
in the top pane of usb-creator, pick the .iso file that you downloaded.
if the .iso file isn't listed, click "Other" to locate and select the .iso file that you downloaded.
Alternately, if you have a CD or DVD-ROM with the Ubuntu version you want to install on the USB flash drive, insert it in your CD-ROM drive and usb-creator can use that.
It is not necessary to erase the USB flash drive, however it is advisable that you do so.
Select the first bootable partition on the USB device as the disk to use
The bootable partition should be formatted as either a FAT16 or FAT32 filesystem. This is the default for most USB flash drives.
Note: NEVER use one of your hard drive partitions in this process unless you really know what you are doing, as data will get erased.
There may be a bug during the formatting which will cause two partitions to appear when booting from the USB flash drive. Try selecting each of them and one should work. If not, restart the computer and try booting from the USB flash drive again.
If you get a DBus error with usb-creator, this bug report may be helpful: https://bugs.launchpad.net/ubuntu/+source/usb-creator/+bug/458334
4.2 From Mac OSX
4.2.1 UNetbootin (Automated, graphical approach)
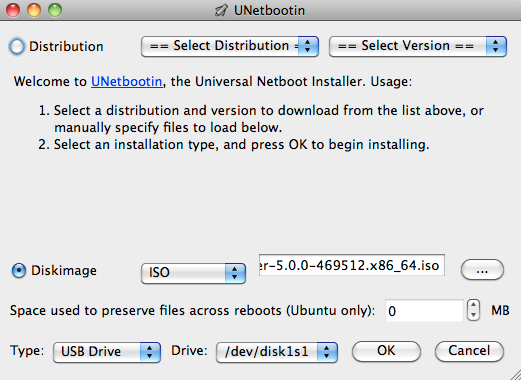
Unetbooting lets you create bootable images in OSX, resulting USB Flash drives are only bootable on PC's
UNetbootin for Mac OS X can be used to automate the process of extracting the ISO file to USB, and making the USB drive bootable. The resulting USB drive, however, can be booted on PCs only. If attempting to make a USB drive that can be booted from a Mac, or if UNetbootin does not successfully create a bootable drive, follow the instructions below.
4.2.2 Manual Approach
If you would prefer to use a USB bootable in Mac, please follow the instructions below.
Note: This procedure requires an .img file that you will be required to create from the .iso file you download.
Drag and Drop a file from Finder to Terminal to 'paste' the full path without typing and risking type errors.
Download the desired file
Open the Terminal (in /Applications/Utilities/ or query Terminal in Spotlight)
Convert the .iso file to .img using the convert option of hdiutil (e.g.)
hdiutil convert -format UDRW -o ~/path/to/target.img ~/path/to/XBMCbuntu.iso
OS X tends to put the .dmg ending on the output file automatically.
Run
diskutil list
to get the current list of devices
Insert your flash media
Run
diskutil list
again and determine the device node assigned to your flash media (e.g. /dev/disk2)
Run
diskutil unmountDisk /dev/diskN
(replace N with the disk number from the last command; in the previous example, N would be 2)
Execute
sudo dd if=/path/to/downloaded.img of=/dev/diskN bs=1m
(replace /path/to/downloaded.img with the path where the image file is located; for example, ./XBMCbuntu.img or ./XBMCbuntu.dmg).
Using /dev/rdisk instead of /dev/disk may be faster.
If you see the error dd: Invalid number '1m', you are using GNU dd. Use the same command but replace bs=1m with bs=1M.
If you see the error dd: /dev/diskN: Resource busy, make sure the disk is not in use. Start the Disk Utility.app and unmount (don't eject) the drive.
Run
diskutil eject /dev/diskN
and remove your flash media when the command completes
Restart your Mac and press Option while the Mac is restarting to choose the USB flash drive
4.2.3 MacBook Air 13" 2010
Please notice: While all of the info and above commands are executed properly on a MacBook Air 3,2 (that is the 2010 version 13" version of the Air) the end result will not produce a bootable USB device, at least not with the image for Ubuntu 10.10 64-bit. When booting of the USB device the following message or something similar will appear: "Missing operating system" and the process is auto-magically halted.
To get the USB device (e.g. a USB stick) to show up at all in the boot menu you also may have to reboot/turn on/off the computer a couple of times and also resync the partition tables using rEFIt. After doing this the USB should then appear as a bootable device while holding in the alt or c key when you are rebooting the computer. Notice that both the computers built in bootloader and rEFIt will identify the USB device as a Windows device, but that's not a problem and expected.
A workaround to the-usb-device-is-not-booting-problem is to:
Install rEFIt.
Create a bootable start disk using Ubuntu and a USB stick.
Create a separate partition on the Airs HD.
dd the whole USB stick to that partition.
Resync with rEFIt. Turn power off and on.
Select Pingo/Windows logo: Install should start. (Here you might want to press F6 to change parameters, e.g. use nomodeset)
Alternatively, burning a CD and installing via an external CD-drive will work fine on the Macbook Air 3,2.
4.3 From Windows
Creating a XBMCbuntu or Ubuntu USB disk is easy, including Live mode.
Download and use Live USB Creator aka LiLi.
Choose a USB flash drive in the dropdown list
Select an ISO/IMG/ZIP file or Download
If you want to create a Live USB choose the size of persistent data (usually between 250 MB and 2 GB)
Check the options you want
Click the lightning button to start the creation
Each mandatory step (1, 2 and 3) has a traffic light to indicate its state:
Red light: the step has not been carried out correctly, you cannot start creating a Live USB key Orange light: there is a non blocking problem during this step, you can still start the creation Green light: everything is fine
Note: Instead of usb-creator.exe you can use Unetbootin to create a bootable USB flash drive. http://unetbootin.sourceforge.net/
You won't be able to select the USB flash drive if it wasn't formatted in a way that Windows can see it. You may have to format it using Windows Explorer in order for it to show up in a creator tool.
5 Booting the Computer from USB
Remove all unneeded USB items, but keep the network cable attached.
Insert the bootable USB flash drive that you just created in your target computer and restart it. Most newer computers can boot from a USB flash drive. If your computer does not automatically do so, you might need to edit the BIOS settings.
Restart your computer, and watch for a message telling you which key to press to enter the BIOS setup. It will usually be one of F1, F2, F8, DEL, ESC or F10. Press this key while your computer is booting to edit your BIOS settings. (On HP Mini Netbooks, they correct key is usually F9, Asrock ION machines is F11)
Instead of editing BIOS settings, you can chose a boot device from the boot menu. Press the function key to enter the boot menu when your computer is booting. Typically, the boot screen displays which key you need to press. It maybe one of F11, F12, F10. Note: with some motherboards you have to select 'hard disk/USB-HDD0' to choose the USB flash disk.
If you need to edit the Boot Order, depending on your computer, and how your USB key was formatted, you should see an entry for "removable drive" or "USB media". Move this to the top of the list to make the computer attempt to boot from the USB device before booting from the hard disk.
Note: Some Machines may not support booting from USB flash drive. Plop boot manager makes it simple to boot from CD and then boot from USB flash drive, you still require a CD drive in the machine via this method.
Plop boot manager For more instructions and download.
5.1 Mac
Restart your Mac and press Option while the Mac is restarting to choose the USB flash drive
6 Alternative methods
6.1 Installing XBMCbuntu directly on a USB flash drive
In order to install a fully working Ubuntu operating system on your USB flash drive make sure that:
Your USB flash drive has more than 2GB of space
Your USB flash drive is bootable
Your USB flash drive has a high read/write speed and is USB 2.0 enabled
Your USB flash drive has persistence enabled
See A better way to create a customized Ubuntu live usb drive
Note: Though it refers to Ubuntu you can adapt it 100% to XBMCbuntu iso, since being a variant of Ubuntu anyway.
6.2 Create Bootable USB Manually
Here is a way to create a bootable USB flash drive manually. The advantage is you don't have to empty your USB flash drive as long as you have enough space for the files. It also allows multi boot, so you can, for example, have your USB flash drive holding other OS and other Boot CD tools at the same time.
In order to do so you need :
Bootable USB flash drive ( NTFS / FAT32 / FAT 16 ), Disk with MBR, you can do this with gparted in Linux or HP format in Win, fdisk ....etc
XBMCbuntu or Ubuntu ISO
Tools to extract files from the ISO ( ISO Mount, WinZIP, WinRAR, 7Zip, etc....)
Grub4Dos
Grub4DOS Tutorial
Grub4DOS 0.4.4 for WIN9x/DOS/Linux (Download Here)
Grub4DOS GUI for WINXP/Vista/7 (Download Here
First you need to install grub onto the USB's MBR. Follow the link to the Grub4DOS Wiki: Simple example:
./bootlace /dev/sdx
For more details, visit: grub4dos
Next, you open up the ISO file and extract the files in casper directory. The size (and possibly manifest) are needed if you want to install from the USB flash drive otherwise the install will fail.
total 701060
-rwxr-xr-x 1 adrian adrian 38784 2010-07-27 16:15 filesystem.manifest
-rwxr-xr-x 1 adrian adrian 10 2010-07-27 16:15 filesystem.size
-rwxrwxrwx 2 adrian adrian 704487424 2010-04-29 05:38 filesystem.squashfs*
-rwxrwxrwx 1 adrian adrian 9365872 2010-04-29 05:34 initrd.lz*
-rwxrwxrwx 1 adrian adrian 4029792 2010-04-16 06:01 vmlinuz*
/media/Fujitsu 60GB USB/bootimg/ubuntu.10.4.x86$
Copy grldr to the root of the drive.
drwx------ 1 adrian adrian 4096 2010-05-05 16:49 bootimg/
-rwxrwxrwx 1 adrian adrian 220049 2009-09-24 17:30 grldr*
-rwxrwxrwx 1 adrian adrian 2760 2010-05-04 23:08 menu.lst*
/media/Fujitsu 60GB USB$
Now create menu.lst at the root of USB. Example of menu.lst:
default /default
#####################
title Ubuntu 10.04 LiveCD
find --set-root /bootimg/ubuntu.10.4.x86/initrd.lz
kernel /bootimg/ubuntu.10.4.x86/vmlinuz boot=casper live-media-path=/bootimg/ubuntu.10.4.x86/ ignore_uuid
initrd /bootimg/ubuntu.10.4.x86/initrd.lz
boot
Make sure the path match where the files you copy to.
Now, reboot.
6.2.1 Simpler way using the ISO file
Another way is just using the ISO file as it is on an already bootable USB flash drive that uses Grub (to create one, see above).
Copy the iso file onto the USB flash drive in the root (top) directory
Add these lines to the menu.lst file:
title Ubuntu 11.04 i386
find --set-root /ubuntu-11.04-desktop-i386.iso
map /ubuntu-11.04-desktop-i386.iso (0xff)
map --hook
root (0xff)
kernel /casper/vmlinuz file=/cdrom/preseed/ubuntu.seed boot=casper iso-scan/filename=/ubuntu-11.04-desktop-i386.iso splash quiet --
initrd /casper/initrd.lz
Note: This might not work with all versions of grub. It was tested with GRUB4DOS 0.4.4 2008-11-11
7 Known Issues
Ubuntu 11.04 is having issues with USB flash drives from SanDisk that have U3 Launchpad. You can either use another brand or use either u3-tool from Ubuntu Repositories or SanDisk's U3 Launchpad Removal Tool to remove U3.
Ubuntu 10.04.3 is having issues. You might get a segmentation fault if used from command line. There are many launchpad bugs regarding segmentation fault (eg: 572611).
Some BIOS's (eg., the Eee PC netbook') have trouble recognizing that the USB is bootable. You may have to trick it into booting using the following method: At boot, enter the BIOS by pressing F2. Then, right as you exit the BIOS, hit the Esc key. For some systems, this will bring up the boot menu.
The error "Can not mount /dev/loop1 on /cow" is because usb-creator.exe is not creating a valid casper-rw file holding ext2/ext3 filesystem. Fixes:
Use Unetbootin or
After running usb-creator.exe, recreate casper-rw using cygwin tools or http://www.pendrivelinux.com/casper-rw-creator-make-a-persistent-file-from-windows/. (As of April 2010)
You need Mac OS X to create a USB flash drive that can boot on Macs. Even so, the process is less reliable than using a CD, as the USB flash drive is not always recognized on boot. Reversely, you can't create bootable USB flash drives for other platforms than Macs from withing Mac OS X. This is because Macs use a custom EFI bios with a custom boot-loader and need a special filesystem layout to boot correctly.
7.1 Resolving problematic installs
If you are having problems not being able to get the installer to behave, below some steps that should correct that.
Boot your system with the installer thumbdrive and select the "Try Ubuntu" option. This should boot into XBMC.
Click the Shutdown menu in XBMC (lower-left corner) and select "Exit"
You should be presented with a log-in screen. Click "Other..." and enter xbmc as the login and select XBMCbuntu from the dropdown menu (below the Login field).
Click "Login" and you will be prompted for the Password; just leave it blank.
Click "Login" again and the XBMCbuntu desktop should be displayed.
On the top-left corner of the desktop should be an icon to install Ubuntu. Double-click the icon and, hopefully, you'll get the installation wizard this time.
8 See also
See also: XBMCbuntu and XBMCbuntu FAQ
9 Credits
These instructions have been adapted from the Ubuntu Community Documentation and credits for its creation are attributed Ubuntu Documentation Team as per their creative commons licence 3.0.
